Showing posts with label home decor. Show all posts

Thursday, August 2, 2012

DIY Picture Frame

I love taking pictures. There is no better way, in my opinion, to hold onto those special memories than taking a picture. It is always cool to showcase your unique memories in a frame that is just as creative and fun! 

Today I've created a frame using my new favorite craft item: homemade fabric yo-yos!

I started with some vintage fabric (that is most likely older than I am!) and an unfinished wooden frame. 


I stained the frame with my favorite stain by Minwax. Their "Dark Walnut" color has absolutely no red in it, which is the way I like my brown wood stain. This color stain drys into a deep, luscious dark brown.
(This is the same stain I used for this furniture project!)  


After the stain was dry I sealed it with a clear coat of polycrylic.


I made some medium-sized yo-yos out of the vintage fabric and fixed them to the frame.


I played around with the yo-yo placement before I permanently attached them. 


Finished! 
I love the quirky, vintage look!


Thursday, April 5, 2012

Pinterest Thursday!

I have a few photos for you...today I'm inspired by the whimsical nature of polka dots!


Polka dot cake! From the blog Snowy Bliss.


DIY Polka Dot Rug. So easy & adorable! From the sensational blog A Beautiful Mess.

A brightly colored polka dot Tapir. From the online retailer The Good Machinery
This little critter makes me smile. How wonderful would this little guy look on a bookshelf or cabinet!


Happy crafting!

Wednesday, April 4, 2012

Tangerine Tango Striped Vase

Inspired by Pantone's 2012 Color of the Year, I decided to add some juicy orange stripes to an unloved & unused vase I've had hanging around my home for many years. 

Old, boring vase.

 While I was in the craft store picking out neon paints for my DIY painted wooden spoons, I spotted the Martha Stewart line of craft paints. She has this glitter paint that I had not seen before, and before I knew it, I was walking out of the craft store with two more paints than I originally went in to buy. Oh no, so sad.

The Martha Stewart paint claimed that it could be used on a variety of surfaces!

Since my vase was glass, I cleaned its surface with alcohol, as per the instructions. 
I wish I could tell you that I also made myself a martini with said alcohol, but alas, it was about 11 o'clock in the morning when I undertook this project. Just a wee bit too early for martinis for me!

After the surface of the vase was sufficiently drunk, I used blue painters tape to tape off my stripes. 


I did three coats of regular shiny orange paint & one top coat of the awesome glitter orange paint. 
The directions for using this paint on glass noted that the piece needed to cure for 21 days, and then it would be top-rack dishwasher safe. Since I do not plan on washing my new vase in the dishwasher, I went ahead and bought some pretty pink flowers and used it the same day!


It turned out just like I imagined! The project was super easy, just a little time consuming since I let the paint dry for an hour between coats. 
I love how with just a little time & paint I was able to turn sometime that was destined for the recycle bin into something that I actually enjoy looking at now!


Happy crafting!


I've linked up with Tip Junkie & Chic on a Shoestring Decorating today!
Tip Junkie handmade projects


Chic on a Shoestring Decorating

Tuesday, April 3, 2012

Neon Painted Wooden Spoons!

I'm really digging the neon colors that are trending this season. Bright colors have the ability to instantly transform a space, adding warmth & excitement!
When I saw this tutorial from Little Bit Funky, I knew I wanted to try it out for myself!
Here is another example of wooden spoons painted in a much softer palette.
I went to my local craft store & picked up a couple bottles of neon craft paint & inexpensive foam brushes. I always keep primer & polycrylic on hand because I use both products quite often. 
The wooden spoons came straight out of my kitchen! 

Before!

I used blue painters tape to make a clean, straight line where I wanted the paint to stop.

I primed the ends of my spoons with primer.
I rested them on left-over wood pieces from this project. (They are the top pieces from the turquoise shelving unit. I cut them off to make the shelving unit fit our kitchen. I had been hanging onto these wood pieces for nearly a year! Earlier today I had actually thrown them in the trash(!) because I had not come up with a use for them. Low and behold, when I was looking around the house for something to rest my wet spoons on, I spotted these in the trash. They are perfect for resting drying spoons on!)

My neon paint. I ended up not using the neon green; instead I used some of the turquoise paint I used for the shelving unit in the kitchen.


After!
Check out how cute they look in my drinking glass jar. 

I think they turned out great! Very bright & cheery. I ended up doing one coat of primer, three coats of paint, and one coat of shiny sealer. 


I hope you have been inspired to brighten up your kitchen by making your own painted wooden spoons!
Craft on!

Tuesday, March 27, 2012

White Ceramic Chicken

This is a quick & easy DIY makeover that has a big impact. 
Every once in a while I make time to check out the local thrift stores. The last time I went I found this amazing ceramic chicken. I love chickens & this little one was pretty cute, but rather tired looking. I knew I had to take it home with me & make it pretty!

Before Chicken

After I got the chicken home I cleaned it with soap & hot water, then let it dry completely.

I took it outside with a drop cloth, and used spray primer & spray paint to make it pretty!
I used one coat of Zissner spray primer (because that stuff sticks to everything!) and two coats of Heirloom White spray paint.
I let the paint dry then sprayed it with a coat of polycrylic. The Heirloom White paint is a matte finish which is why I chose to finish the chicken with polycrylic; I wanted a shiny chicken. If my spray paint was a glossy finish I would not have bothered with the sealer coat. 

After Chicken!


Check out how nice the chicken looks now! 
I have not decided where it will stay, but for now it is hanging out on my newly updated IKEA bookshelf. (Blog post to come later!)

This was a quick & simple project that transformed a forlorn thrift store find into one of my favorite home decorations! I hope you will be inspired to transform one of your old statues into a new treasure!


I am linking up with Tip Junkie today!
Tip Junkie handmade projects

Thursday, March 22, 2012

Pinterest Thursday!

Welcome to Pinterest Thursdays! 
I've got some awesome pink inspiration for you today!

I would love to paint my chandelier pink!


I love the pink, orange & turquoise combination


Shiny pink modern shelving


This is so different. The XL desk lamp is really funny.


So comfy looking! Bedding set comes complete with complimentary kitty. 


I hope you enjoyed this week's edition of Pinterest Thursday!
As always, thanks for joining me!

Thursday, March 8, 2012

Pinterest Thursday!

It's Thursday...you know what that means! 
Today's inspiration is one of my most favorite colors. Seriously, I can't help but smile when I see something pink!
I hope you find some pink inspiration from today's Pinterest finds!


Love this textile! 


Yellow chevron & pink chairs....perfection!


Pink triangles...so cool


Pink & Zebra!


This is just wonderful. What a bright & happy shade of pink.


I hope you enjoyed the pink today.
Thanks for joining me for Pinterest Thursdays!

Wednesday, March 7, 2012

Superdrag Pillow!

I love sewing & I love music. I also love re-using things that were otherwise going to be thrown away. 
These three loves of mine were the inspiration for my latest project - the
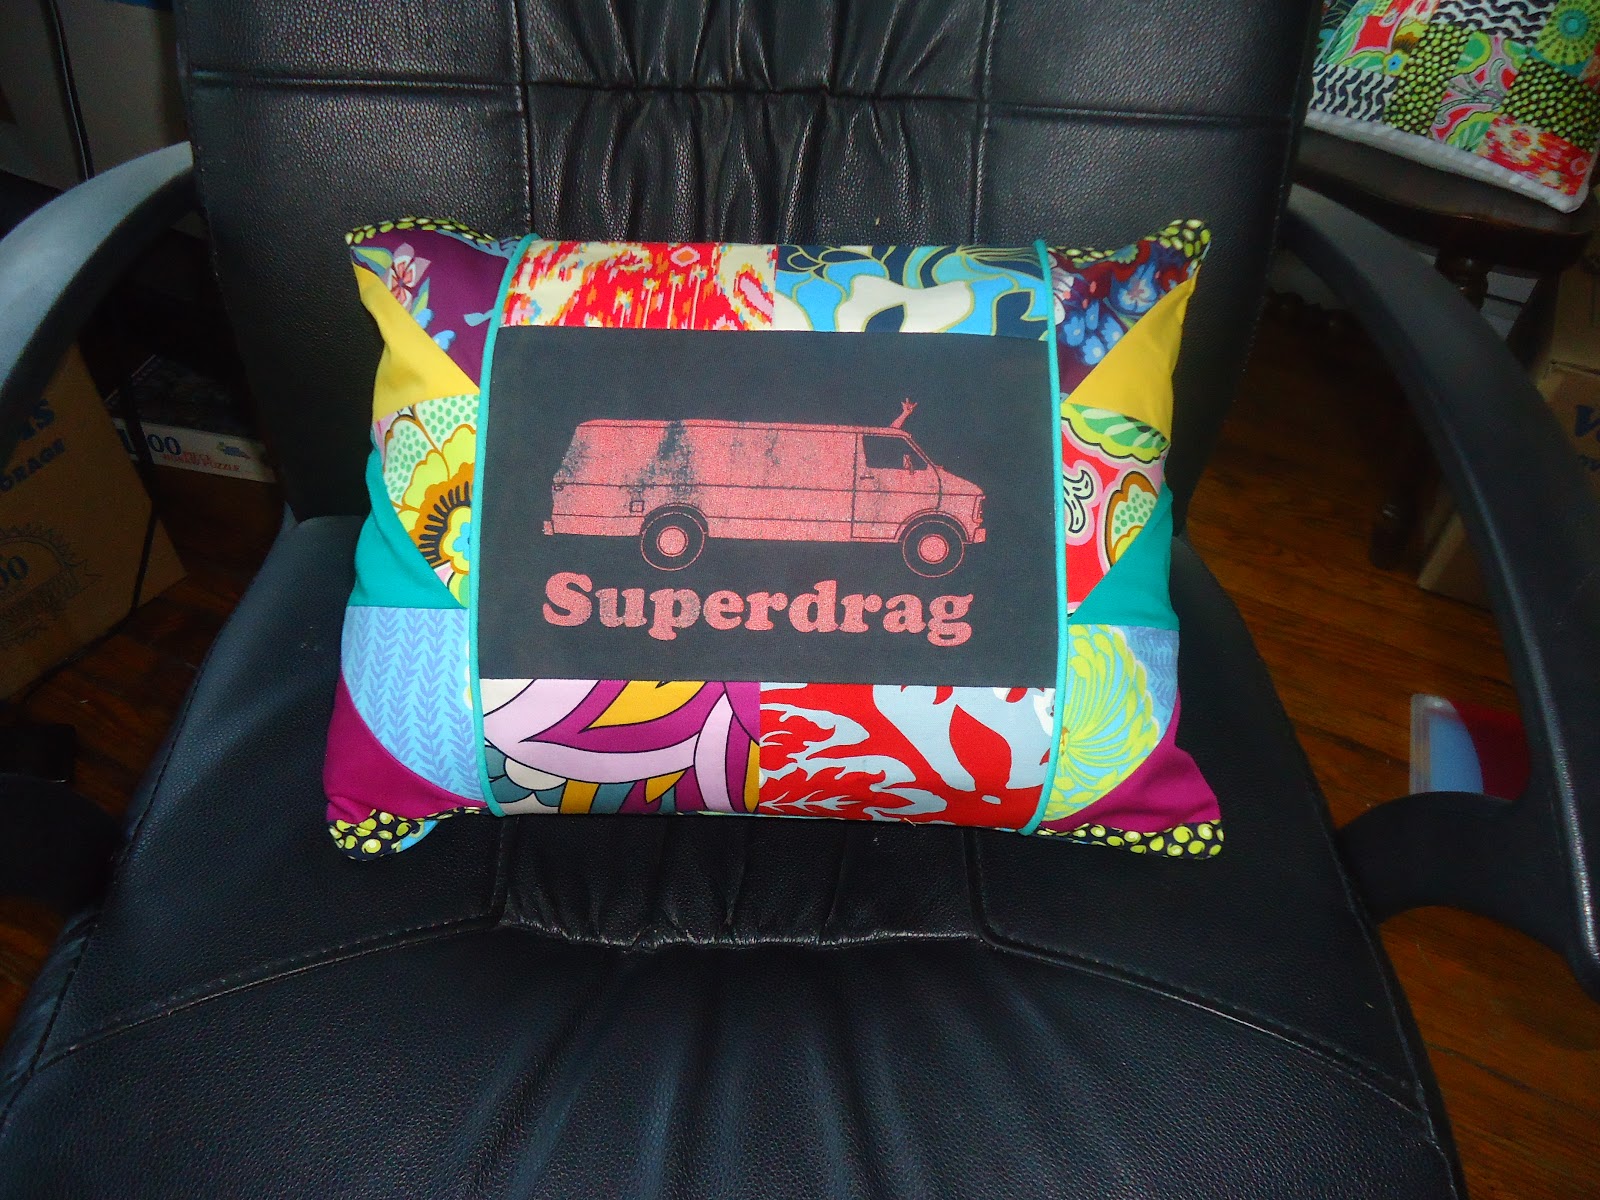
 Superdrag pillow!

S loves live music & as a result, he has so many concert t-shirts. We have been steadily going through our belongings & trying to downsize. The other weekend we both went through our closets & compiled three large trash bags of clothes we wanted to donate to Goodwill. Some of our clothes were un-donateable...really, unwearable, on the last thread of their existence.
While I do not mind tossing out old socks with holes in them & other like-minded clothes, I could not stomach S wanting to toss out some of his old concert t-shirts! I mean, those things have a history! Concert t-shirts should last forever, even if they have holes in the armpits & fraying threads everywhere. 

Concert t-shirts are reminders of good times that were had & should be kept forever!  

Since S was not as moved as I was, I confiscated his three concert t-shirts from the trash pile & made the decision to make pillows out of them. I mean, he had had the Superdrag t-shirt for over 10 years....I could not let him throw it away!

I spent all day yesterday making this one so I could surprise S when we saw each other at the end of the day.
I finished it just in time & he was surely surprised! 
I was happy. =)


I hope you are inspired to re-use an item of yours that was destined for the trash bin & make it into something beautiful!


Before!

Check out the frayed collar

And the holes in the armpits!
This t-shirt is perfect to me......I can't believe S wanted to toss it away!

I drew up my own "pattern". I re-did the measurements a few times, but in the end the project turned out exactly how I wanted.


During!

Front panel
I interfaced every piece of fabric that went into this pillow.
I used a mix of vintage t-shirt, vintage canvas, designer quilting fabric, non-designer quilting fabric (the yellow), & a random piece of hippie-looking fabric I bought in 2009.

The entire front - finished
I cut & pieced those triangle pieces myself!
And check out that aqua piping---awesome!

The front & back panels - I opted for an exposed zipper for a quirky look


After!


Click the pictures to make them bigger!


Back zipper detail


Side detail

Other side detail

Biscuit & the Superdrag Pillow!