Showing posts with label Before and After. Show all posts

Wednesday, March 28, 2012

Kilby Gets an Upgrade

So, I have a lot of stuff. I don't mean to acquire so many things as I do, it just happens! So many tiny things go into sewing, crafting & the like...it is difficult to be a crafter without things to craft with! As a result, I need a ton of storage. 

Two apartments ago S and I bought the Kilby from my favorite home store, IKEA. The Kilby has been very useful for storing things, but unlike its grown-up big brother, the Billy, the Kilby is not very pleasant to look at. The blonde wood is okay, not my favorite; but the nondescript grey backing is just so sad. I've been wanting to cover it up for some time now, but have been unable to commit to a pattern.

In case you were wondering why S and I bought the ugly bookshelf, it is because the Kilby costs decidedly much, much less than any of the comparable Billy products. In fact, I just bought my first Billy shelf this week!  

Last week S and I had a rare day off from work together. The whether was great so we hit the city, hanging out at all our favorite places. I decided that today was the day that we fix up the sad Kilby, so we went to Trohv, I picked out all  my favorite spring-weather papers, and we went home & got to work!  


Before!
See the grey + blonde bookcase on the right? Sad, huh.


 Before - All cleaned off. Notice we also took down the black wall shelf on the left?

Before

 We cleaned the Kilby from top to bottom to get rid of all the dust.
To test out the effectiveness of this adhesive we put a test strip of paper on the bottom. 
What pretty piece of test paper!
As expected, the adhesive worked great.


I laid out the paper rolls to measure. I wanted to cut as little as possible.  

We taped the edges of the shelf walls with painters tape to protect them from the spray adhesive.

We decided to cut the paper about an inch longer on each side so we could razor the edges for a nice, clean finish.


After!


I just love how it turned out! The sunroom is SO much more cheery now that the grey backing has been updated to bright dots & floral prints.
The project was quick & easy; with two people it took us less than two hours from start to finish. 


Thanks for checking out my bookcase makeover! I hope you have been inspired to update an old piece of your furniture into a piece that makes you smile.

Tuesday, March 27, 2012

White Ceramic Chicken

This is a quick & easy DIY makeover that has a big impact. 
Every once in a while I make time to check out the local thrift stores. The last time I went I found this amazing ceramic chicken. I love chickens & this little one was pretty cute, but rather tired looking. I knew I had to take it home with me & make it pretty!

Before Chicken

After I got the chicken home I cleaned it with soap & hot water, then let it dry completely.

I took it outside with a drop cloth, and used spray primer & spray paint to make it pretty!
I used one coat of Zissner spray primer (because that stuff sticks to everything!) and two coats of Heirloom White spray paint.
I let the paint dry then sprayed it with a coat of polycrylic. The Heirloom White paint is a matte finish which is why I chose to finish the chicken with polycrylic; I wanted a shiny chicken. If my spray paint was a glossy finish I would not have bothered with the sealer coat. 

After Chicken!


Check out how nice the chicken looks now! 
I have not decided where it will stay, but for now it is hanging out on my newly updated IKEA bookshelf. (Blog post to come later!)

This was a quick & simple project that transformed a forlorn thrift store find into one of my favorite home decorations! I hope you will be inspired to transform one of your old statues into a new treasure!


I am linking up with Tip Junkie today!
Tip Junkie handmade projects

Friday, March 9, 2012

Bottle Cap Mirror

It is no surprise, I love IKEA. Many items at IKEA have very simple & clean lines, just begging to be customized! IKEA has carried the MALMA mirror for years now. From the first time I saw it, I knew I had to use it to make something really neat. 

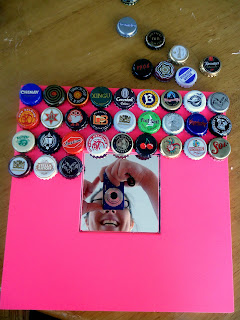
I work at a very fun restaurant. We carry over 200 different types of bottled beer, many of which have really interesting bottle caps. I knew that I could combine my love of beer, my access to many different types of bottle caps, & my love of IKEA to make an interesting mirror for my home.


I bought this plain, black mirror from IKEA


Used painters tape to mask off the mirror part


Primed the mirror with spray-on Zinsser primer. This primer is awesome, it sticks to everything. The finish on the mirror was smooth & shiny, so I knew I needed to use Zinsser in order to make my paint stick.


I used neon pink spray paint from Montana Gold to paint the mirror. This is the same paint I used for my Neon Kitchen Makeover. I just love bright colors. 


I used hot glue to adhere the bottle caps to the mirror. The dimensions of the mirror allowed for exactly nine caps to fit across & nine down. It was perfect!


Close-up!


I'm not finished yet! It is looking really cool so far thought, I wanted to show it to you. 
I love the contrast between the bright, neon paint & the bottle caps.


I hope you have been inspired to personalize a piece from IKEA for yourself!
As always, thanks for stopping by & reading. 

Wednesday, February 29, 2012

Leap into Action

Happy Leap Day everyone!

As we all know, leap day comes around about once every four years, so I decided to celebrate by doing some else I only do about once every four years....clean out my dresser!

To make the chore more interesting I decided to line the drawer bottoms with colorful wrapping paper.
It was easy.
I used my sewing tape measure (the floppy one) to measure the drawer bottoms, cut the paper to side, and used regular tape that I rolled into O shapes to adhere it to the drawer bottoms.

If I can do it, you can do it! 
Just this little trick has turned my chest of drawers into a nightmare of forgotten clothes, into a pretty piece of furniture that I enjoy opening every morning.

I hope this has inspired you to make a little change around your home that will make a big impact!

Before - Disaster!

During - Don't mind that giant clothes pile, most of it came out of the drawers!

Biscuit had to help, of course

Finished!! It looks great. I folded up ALL the clothes that I put back in the dresser, and did not over-stuff the drawers so I could see the pretty paper.

Tuesday, February 28, 2012

I made it onto Ikea Hackers!

I've reached a blog milestone! My Ikea Rast makeover was featured on Ikea Hackers!

I want to thank Jules, the owner & operator of Ikea Hackers, for her dedication towards the blog. It was so much fun to see my work featured on such a well-known blog; I'm sure everybody else that is featured on her blog feels the same way!

Check out my post here:


Thursday, November 10, 2011

Spice Storage in the Kitchen

I love to cook. Love it. Over the years I have collected an exorbitant amount of spices, so naturally I need loads of space in order to store all of them. In our old kitchen we had lots of cabinet space, and lots of wall space..enough space for wall mounted spice racks. We had three nice, white racks that S installed, and I stuffed! 
 In our new kitchen we have about 4% of the space we had in our old kitchen. And of course I have about 100% more little spice jars!
For the first couple months we lived here in the new apartment my giant spice collection lived in a cardboard box  buried at the bottom of S's closet. I had kept the salt, pepper, garlic, cayenne, hot peppers, oregano & thyme stuffed into our only dedicated food cabinet. Nearly every time we opened the cabinet door the spices would come tumbling down! 
We needed spice racks! 
Unfortunately, one of the white spice racks we had at our old place did not survive the move. So I did some research and found some nice, inexpensive racks at IKEA. 
We trekked to IKEA and bought a couple with the idea to paint them white and then we would have four spice racks for me to stuff up again.
So, of course those poor wooden spice racks sat on the floor next to our kitchen for weeks after we bought them. 
That is just how S and I roll.

Then one day S surprised me and while I was at work. He painted, installed, and filled my spice racks!

Before - No Storage!
Before - Unfinished IKEA spice rack

Check out the After pics after the break!

Monday, October 10, 2011

Purple Bedroom Make-Over

When S and I moved into our new Baltimore apartment, it was already painted. S and I both love bright colors & fun paint jobs. Lets just say that the colors in our apartment were batting .500....not horrible, but certainly not 100%.
The bedroom had one wall painted...an interesting grape purple color.


Grape soda, anyone?

It actually would not have been quite so bad, if it weren't for the random and bizarre water stains all over the right side of the wall. 

Do you see the jellyfish shaped water marks? It looks like the previous tenants had a water balloon fight INSIDE the apartment! 

So, short story short, we decided to paint! 

S and I painted our entire last apartment we shared. We picked out some fantastic colors....deep, dark red for the bedroom; straight up turquoise for the living room, and electric green for the dining room. Yeah, we're pretty much bad-ass. (Pictures will come, promise!) 
For our new home I wanted something a little different. I've been reading all over the blogosphere that grey is hott right now for interior design. I thought we could make it work....I envisioned dark slate grey walls that would let our bright duvet cover stand out, and accenting the room with chartreuse accents. 
My vision *almost* worked out. Hehe. Picking paint colors from teeny tiny sample chips does not send me into a design-induced coma like some people. I'm pretty loosy-goosy when it comes to wall colors, sofa colors, pretty much all interior design colors. However, picking the color I envisioned in my head is difficult. S and I milled around the paint chip section of Home Depot for nearly an hour before we thought we found the right color. 
A few days later, S went out and bought a quart of paint, because originality we were only going to repaint the one wall, on top of the grape soda, and paint the 2 skinny walls next to our bed. We started painting and realized that 1 quart was surely NOT enough, even for our little project. And the more we painted, the more both of us realized that the room would look SO HOTT if all the walls were painted. Sooo, S ran out to Home Depot in the early hours of that evening, in the hopes that we could have it all finished by that night. He was so sweet to make the trip. I was so tired I probably would have gotten lost. I kept painting while he was gone, but he was still sweet for driving all then way to uptown to get us paint.
Painting is hard work.     
S bought us another gallon, and even all that did not finish the job. We finished about a week and another quart later. The grey did not turn out to be dark and slate-like, how I envisioned it. However, it did turn out perfect. A nice, soft, moderately dark grey that still looks awesome with my chartreuse lamps and mirror (that I DIY painted!).

We took these pics right after we ripped all the painters tape down from the walls, so the furniture is still chilling in the middle of the room.


Look at those beautiful grey walls behind those tired painters!

Friday, August 12, 2011

Neon Kitchen Re-Do

Our apartment backs up to an alley, which provides us with ample work space. Never again will we make the mistake of spray painting in the sunroom, even if all the windows are open and we are wearing masks!

Since our kitchen is so small, and there was this weird gap between the counter and the fridge, S and I made a trek to our favorite home improvement super-store: IKEA! 

We were on the hunt for two things: Some sort of shelving/storage for the gap area, and a step stool for me. We decided to store the pots & pans on top of the wall cabinets, which S can reach, no problem, but for which I need a little assistance. 

I had done my online IKEA research, so I knew exactly which step stool I wanted.
 Neither S, nor I knew exactly what we wanted for the gap area in the kitchen. We were on a hunt!
After some joyful browsing through the IKEA showroom, S caught sight of something he thought would be perfect, with a little work. 
After some plotting, I agreed, and we brought home the GORM and the BEKVAM. 
Check out the neon colors after the jump!
Unfortunately, we did not prime either piece of furniture. We did sand and clean, but no prime. In hindsight, we should have primed. Some of the knots are showing through on the turquoise piece, but overall, I give the both of us an A+ for our work.

Before - Unfinished wood pieces, ready to be painted!

During - Look at those awesome colors!

Check our some more pics of our neon kitchen re-do, after the break!