Tuesday, January 31, 2012

Chevron Dresser

My uncle owns a store in Virginia named Possessions Recycled. The store stocks a ton of beautiful second hand items in need of new homes!

I was lucky enough to store this awesome four-door dresser. It is made of solid wood, which is always a great thing when you are looking for high-quality furniture. However, it was obvious that this dresser had lived a full life before I acquired it.

There were stickers on some of the drawers, and the finish was chipping in some places. 
In order to save this sold-wood treasure, I turned to my trusty accomplice: spray paint! 

Read on to see how I transformed this dresser from Groovy Throwback to a Modern Chevron Masterpiece!


Here are some before pictures of the dresser drawers. 
Check out those groovy stickers!


First I took the handles off & primed the drawer fronts with Zissner. This stuff sticks to everything: shiny laminate, finished wood, stickers...everything!

After the primer dried I used "Heirloom White" spray paint to paint the drawers. 

Next I measured out my chevron pattern and taped it off.
This part was by far the longest & the most tedious. I think I spend nearly an hour figuring the math & measuring the lines. Then I had to do all the taping!

After the chevron pattern was taped on I sprayed "Heirloom White" over top of the whole drawer front to seal the edges of the painters tape.

Next I taped off the outer edges that I wanted to stay white. (No picture, sorry!)
Then I spray painted the chevron part with a bright blue spray paint. 

As soon as I was finished painting I took the painter tape off. I find it is better to remove painters tape while the paint is wet. 

I let the drawers dry for two days and then protected them with a couple coats of clear polycrylic.

Biscuit loves to help with my DIY projects!

I bought these awesome zebra striped handles to make my dresser even more awesome! 
They were really easy to install. 
I made sure to bring to the old handles with me to the store so I was sure to get the correct size. I did not want to worry about patching the old handle holes and drilling new ones.

The top drawer required two zebra striped knobs.


The After! 

I just love how the whole thing turned out. 
I enjoy that I was able to breathe some new life into an otherwise pretty great piece of wood furniture!
I'm sure Supper enjoys his new perch as much as I do!

Monday, January 30, 2012

Hack-a-Rast!

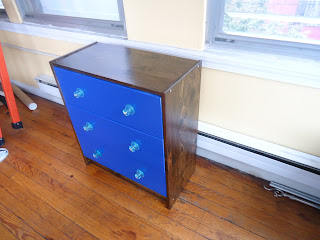
I decided to jump the bandwagon and become the last person on the face of this earth to Hack-a-Rast! I'm so happy that I did. It was a fun, easy & inexpensive project, and now I have an awesome piece of functioning furniture that I can say I made it pretty all by myself! Now that my first one is finished and still looking awesome, I kind of want to make three more. 

Before
IKEA Rast Dresser (photo from Ikea)


During the Hack
S assembled it for me. As far as people go, he is amazing. 
First I took the tiny wooden drawer pulls off. Then I lightly sanded the entire surface.
I the drawers I was going to paint, so I applied primer first. I believe I used Kilz for this since the Rast is untreated, natural wood. (For treated, shiny, or laminate surfaces, Zissners is simply the only way to go.)

While the primer was drying I started staining the outside surfaces. I wanted a medium brown color with no red in it. 
I think I pretty much nailed it.
I did one coat of stain and followed the directions on the can. 

Here is the stain I used & my buffing rag!

Progress. 
On the right side is a primed magazine rack. You will see a post about that later!

While I DIY I like to listen to music. Today it was Nada Surf. 
One of my most favorite bands ever. S introduced me to their music & my life has not been the same. 

I used Montana Gold spray paint to paint my drawers. I wanted more of an electric blue color, but what I got was more bright blue. The can said "Shocking Blue", which is why I thought it would be more...well...shocking.
Its still a nice color, so all is well. Next time I'll try to pick a color with a little more uumph! 
I like Montana Gold because there are many, many colors to choose from, and the coverage seems to be very even. 
You have to be aware of the little plastic doughnut under the spray nozzle though! 
Before you can use the spray bottle you have to take the nozzle off, remove the plastic doughnut, and then put the nozzle back on. 
I didn't know this. 
I was SO excited when I bought my very first can of Montana Gold (For the neon pink step stool). When I went to go use it though, I couldn't make it spray! I gave the can to S, and he couldn't make it spray! 
I ended up taking it back to the store, and the kind girl who was manning (woman-ing?) the counter very nicely showed me how to make it work. 
Long story, short solution.
So, now you know - remove the doughnut!  

More progress!


I bought glass drawer pulls from Hobby Lobby. I went shopping while they were having a 50% off sale, so these six pulls cost me a whopping $19 total. Score!  

Awesome Glass Drawer Pulls with Vampire Weekend Vinyl

This is me being handy with my powder drill!
I had to make the screw holes a little bigger for my new drawer pulls.

Installed!
Look how sparkly!


My stash of DIY paints, stains & sealers!
After I let my Rast dry for a week, I sealed the entire thing with two coats of Polycrylic (which I let dry for 2 days in-between coats).
The Polycrylic is water-based, which makes cleaning up a breeze.
It is quite durable, which makes it my favorite sealer for almost everything!


After! 
I just love how it turned out.


This post was featured at Redoux!

Redoux

Saturday, January 28, 2012

Chartreuse Mirror Make-Over

So, I've had this mirror since before elementary school. It used to belong to a white and gold colored bedroom set with two twin beds, two three-drawer dressers, and this mirror! My little sister and I shared a room until I was sixteen, and I guess this was our first bedroom set.

I don't have a before picture of when the mirror was white and gold. I took the mirror from my childhood home when S and I moved in together to the home in Catonsville. It was there that I painted it purple and it hung in our dining room for a while, partially covered by a giant credenza.

I never got around to re-painting the mirror while we were in Silver Spring. It just sat underneath our bed; waiting for the day when it would shine again!

Now that our bedroom has a totally different color scheme that any of our other bedrooms, I felt it was time to dust off the old mirror and repaint it chartreuse to go along with our Grey & Chartreuse bedroom makeover.


Before
Can you see it in the back of the picture there? Haha, it's there, I promise! It was painted dark purple.


I used one coat of Zinsser spray primer, two light coats of Montana Gold spray paint, and a coat of spray polycrylic to seal the deal!
I love it!

Check out the neat outline the spray paint made on my drop cloth. 
I just had to take a picture of it!  

Spray painting the frame on our fire escape/patio.


After!


Friday, January 27, 2012

Ruffle Clutches

Happy Friday to everybody! 

I've been a little lazy this morning, so this post will be quick. After I finish showing off my Ruffle Clutches I will fly off to my sewing room to whip up a couple of my original patchwork pillows. I just received some awesome white cotton/linen blend fabric from Sew Mama Sew. While I dislike cutting into fresh fabric, I do love creating! The first cut is always the hardest!

I found this awesome tutorial from the talented Noodlhead
I thought they would be the perfect travel pouches for my little sister. She left for Scotland earlier this January for a year-long residency teaching life skills to special needs adults.    

The wristlet handle attachment on one of the pouches is my own design. 
The tutorial from Noodlehead is very straightforward and easy to follow. I recommend that you hop right over to her blog and whip yourself up a cute little ruffled pouch!

The second pouch I created. I used Amy Butler fabric, a vintage zipper, & I designed my own clipped wristlet handle.


I was quite proud of my handle!


The small, purple pouch is the first one I made. I only had two zippers in my stash when I made these, both vintage. So, I had to scale the size of one of the pouches to fit my zipper! The smaller pouch is made with Tula Pink and Anna Maria Horner fabrics. 

Thursday, January 26, 2012

Pinterest Thursday!

It is no secret: I adore Pinterest!

I joined about a year ago, and my electronic life has not been the same. I love posting my completed projects & sharing them with the Pinterest community. In turn, I love the inspiration I get from browsing through everybody else's projects and ideas!

Today I'm going to share with you some of my favorite Pinterest finds that feature one of my favorite things: Glitter!
Please enjoy!

I'm thinking of doing this for the switch plated in the bedroom. Love!


Oh my goodness. Paper Lantern turned Glittery Disco Ball!


I love these! Glittery Wine Glasses


Glittered Mason Jars. So wonderful. 


I hope you have a glitter-filled day!

Wednesday, January 25, 2012

Black & White Patchwork Pillows

I made some pillows!

These are not exactly "new" pillows, as I designed the concept while S and I were living in Catonsville (2.5 years ago), and I cut out all the patchwork squares while we were living in Silver Spring (1.5 years ago). Finally when we moved here, to Baltimore, and I semi-set up my sewing room, I got around to sewing these bad boys up!

I like my pillows on the plumper side, which these are not. My BFFs are not exactly Ms. Tape Measure & Mr. Patients. I wanted to get these pillows finished to help jazz up our beige living room. I did however install invisible zippers in each pillow. It was my first time with invisible zippers and I only messed up once. After I got the hang of the first one, the second one was a breeze.

I used 4 different black & white patterns for the patchwork, which I did cut out and sew together myself. The black fabric & and the polka dot fabric are left over from when I upholstered my vintage sitting chair. The black fabric is a flocked damask that I scored at JoAnn Fabrics during one of their 60% off sales, and the polka dot is simple quilting fabric that I used to line the underside of the chair.

The 2 damask prints I also picked up (on sale) at JoAnn. The larger print I used first to make a kitty throne for Comet in Catonsville. After he tired of it I decided it would go nicely with my pillows.


Comet claiming my fabric

King Kitty on his Throne
( I wrapped & taped the fabric around a large Tupperware bin that I used to store my craft supplies in. Two birds, one cat throne.) 

Well, I was going to just show you a picture of the newly upholstered chair (from 2009). Looks like you get a bonus cat as well. (The chair was originality blue. Seems like I don't have a before picture to show you. Bad blogger!)


And now....the pillows!

Oh how cool did they turn out? 
I used striped IKEA fabric for the pillow backings. Black and white, of course.


Thanks for looking, guys! Cheers!