Thursday, April 26, 2012

Blog Inspiration Day

Most Thursdays I post pictures that I find on Pinterest that inspire me. 
Today I thought I would do things a little differently...I'm going to link straight to the blogs that have been inspiring me this week!

::

One of my favorite blogs, You Are My Fave, posted about the most talented Denise Hedin. She makes art prints & custom art prints that you can buy on etsy.  
Seriously. How adorable is her art.

::

Now, I know we have all seen the DIY envelope liners before, but I think these from Yours is the Earth are divine. 

They are simple & whimsical...just my style.


::

I hope you have been as inspired by these two lovely, creative ladies as I have!

Happy Thursday! 

Tuesday, April 24, 2012

Hey! I'm Back!

So, sorry to all my lovely readers for the long blogging break I took without notice. A lot of things have been going on around the Hey Fish! Studio.

Firstly, one of my art pieces was featured in an art show over the past weekend. The School 33 Art Center here in Baltimore is one of the leading advocates for art in Baltimore's community. To help support their mission, every year they host a Benefit Art Show where local artists donate their art to the show. The art is then auctioned off & the proceeds go back to the art center. As as artist you have to put an application in & have your art chosen to be part of the event...and mine was! It even got sold by the end of the night. How about that. I was very happy & humbled that my art was able to help support School 33. 

My art is the one in the middle on the bottom...the Oriole bird print.

Since this was such a big event for me, I decided I needed to do something big to make this night truly special. So, I decided to make my own dress!
A daunting task, for sure, but I was up for the challenge! 

I took an old dress of mine as inspiration, drafted my own pattern (sleeves were all my own idea!), bought the fabric, & went to work!


The Facts 

Fabric: Cotton Poplin with 4% stretch, from the 'April Johnson for Project Runway' line from JoAnn's
Pattern: Self-Drafted
Year: 2012
Notions: White thread, Turquoise 12" zipper, Turquoise piping for the top of the bodice
Time to complete: About 6-7ish hours....basically two whole days of sewing.
First worn: April 21, 2012 - For the Lotta Art Benefit Show
Wear again? Yes!
Total Cost: I bought the fabric for 50% off, I had the piping & thread from my stash, so I only had to buy the zip. I would say the whole dress cost about $17 to make. Woot Woot!


Friday, April 6, 2012

Oriole's Opening Day!

Happy Friday to everybody out there!

I have no DIY post for this afternoon because S & I are heading down to Camden Yards to participate in Baltimore Baseball's Opening Day!


Thursday, April 5, 2012

Pinterest Thursday!

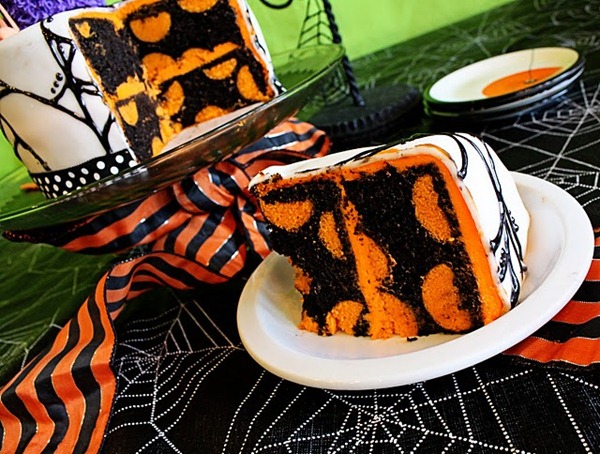
I have a few photos for you...today I'm inspired by the whimsical nature of polka dots!


Polka dot cake! From the blog Snowy Bliss.


DIY Polka Dot Rug. So easy & adorable! From the sensational blog A Beautiful Mess.

A brightly colored polka dot Tapir. From the online retailer The Good Machinery
This little critter makes me smile. How wonderful would this little guy look on a bookshelf or cabinet!


Happy crafting!

Wednesday, April 4, 2012

Tangerine Tango Striped Vase

Inspired by Pantone's 2012 Color of the Year, I decided to add some juicy orange stripes to an unloved & unused vase I've had hanging around my home for many years. 

Old, boring vase.

 While I was in the craft store picking out neon paints for my DIY painted wooden spoons, I spotted the Martha Stewart line of craft paints. She has this glitter paint that I had not seen before, and before I knew it, I was walking out of the craft store with two more paints than I originally went in to buy. Oh no, so sad.

The Martha Stewart paint claimed that it could be used on a variety of surfaces!

Since my vase was glass, I cleaned its surface with alcohol, as per the instructions. 
I wish I could tell you that I also made myself a martini with said alcohol, but alas, it was about 11 o'clock in the morning when I undertook this project. Just a wee bit too early for martinis for me!

After the surface of the vase was sufficiently drunk, I used blue painters tape to tape off my stripes. 


I did three coats of regular shiny orange paint & one top coat of the awesome glitter orange paint. 
The directions for using this paint on glass noted that the piece needed to cure for 21 days, and then it would be top-rack dishwasher safe. Since I do not plan on washing my new vase in the dishwasher, I went ahead and bought some pretty pink flowers and used it the same day!


It turned out just like I imagined! The project was super easy, just a little time consuming since I let the paint dry for an hour between coats. 
I love how with just a little time & paint I was able to turn sometime that was destined for the recycle bin into something that I actually enjoy looking at now!


Happy crafting!


I've linked up with Tip Junkie & Chic on a Shoestring Decorating today!
Tip Junkie handmade projects


Chic on a Shoestring Decorating

Tuesday, April 3, 2012

School 33 Art Center Benefit - Donating Art for a Great Cause

I've always considered myself an artist. I think my love of creating art began some time around grade school, but it didn't really set in until I was in high school that I knew I needed to make art a part of my daily life. I took many art classes in high school; drawing, painting, photography. I worked hard at it, and even won 'Best in Show' at my Senior Art Show. 

After high school I dabbled in collage art, enjoying the many uses of mod podge. I've tried my hand at so many styles; 3D art, jewelry as art, fabric art, and using video as an art medium. During my late college years I took a printmaking class that opened my eyes to a new way to practice art. Through the years I've been lucky to study under some very talented and understanding art professors. 

 Thanks to social media, I recently discovered an art center located in downtown Baltimore than has championed art right here in the city for nearly 30 years. Every year the School 33 Art Center hosts a Benefit to help support their mission. The Lotta Art Benefit is great because not only do the proceeds go to help support School 33, but all the ticket holders get to go home with an original work of art!

This is the 20th year that School 33 has held this Benefit....and this year one of my art pieces has been accepted to be auctioned off!!

I am over the moon that I have the opportunity to give back to Baltimore's art community.
I never thought in a million years that I would be "good enough" to sell my art...let alone give my art away for a real, live benefit event. I am so thankful for everybody at School 33 who recognized my potential & was excited about my art. MY art!!

(My listing is towards the bottom the the page.)


Happy Art-ing! 

Neon Painted Wooden Spoons!

I'm really digging the neon colors that are trending this season. Bright colors have the ability to instantly transform a space, adding warmth & excitement!
When I saw this tutorial from Little Bit Funky, I knew I wanted to try it out for myself!
Here is another example of wooden spoons painted in a much softer palette.
I went to my local craft store & picked up a couple bottles of neon craft paint & inexpensive foam brushes. I always keep primer & polycrylic on hand because I use both products quite often. 
The wooden spoons came straight out of my kitchen! 

Before!

I used blue painters tape to make a clean, straight line where I wanted the paint to stop.

I primed the ends of my spoons with primer.
I rested them on left-over wood pieces from this project. (They are the top pieces from the turquoise shelving unit. I cut them off to make the shelving unit fit our kitchen. I had been hanging onto these wood pieces for nearly a year! Earlier today I had actually thrown them in the trash(!) because I had not come up with a use for them. Low and behold, when I was looking around the house for something to rest my wet spoons on, I spotted these in the trash. They are perfect for resting drying spoons on!)

My neon paint. I ended up not using the neon green; instead I used some of the turquoise paint I used for the shelving unit in the kitchen.


After!
Check out how cute they look in my drinking glass jar. 

I think they turned out great! Very bright & cheery. I ended up doing one coat of primer, three coats of paint, and one coat of shiny sealer. 


I hope you have been inspired to brighten up your kitchen by making your own painted wooden spoons!
Craft on!