Showing posts with label Sewing. Show all posts

Friday, November 2, 2012

Fabric Friday!

Loving these new patterns by Amy Butler!


I hope you all have a lovely weekend! 
I'll see you back here on Monday!

Thursday, November 1, 2012

I Won My First Blog Give-Away! Vogue 9803 & Simplicity 6407

Weeks ago I won a give-away from a blog I read! It was the first blog give-away that I have ever won. I received a couple patterns in the mail, then promptly stored them in my pattern box. Unfortunately, the blog writer has stopped production on her blog, but I thought I would share her sweet gift with you all anyway!

Two vintage patterns waiting for me to sew them up!


Wednesday, October 31, 2012

Gearing Up For Merry Mart!

Now that the warm weather is behind us, I have turned my attention to the holiday season. Specifically, trying to fine tune my shop and gear up for my first craft show! 

On Dec. 2nd I will be vending my hand-sewn items at Merry Mart, the annual craft show put on by The Creative Alliance. Many of the best local artists and artisans will be there as well, vending their awesome creations. 

I've decided to create some things for the show that I've never tried before. The other day I created a stunning clutch bag using twill fabric that I hand-stamped with gold screen printing ink. 
I can't wait to make more of them!


Thursday, August 23, 2012

Fabric Cat is Covered in Fabric

Remember yesterday when I told you the story of my fabric basket fail? My original idea was to create this fabric basket for my lighting cords, then "hide" the basket with an adorable 2-D or 3-D kitty. Because who doesn't like kitties?

So, after I created my ridiculous pink and green pouf, I was somewhat disappointed in its lack of basket-shape, so I thought if I just made this awesome cat thing, then nobody would notice that my cord pouf was not a basket!

I made a cat all right. A rainbow-tailed, big-nosed, smiling, furry, happy cat! 

I cut the cat tail, body, nose, ears, and paws out of craft weight interfacing. This stuff is thick & sturdy, as I had intended to have this cat sit upright, attached to a fabric basket. 


I attached the fabrics to the interfacing using the iron, then hot glued all the edges to the backsides of all the shapes. I hope that makes sense. 


I hot glued the ears, nose, tail, and feet on. The I cut a piece of glitter paper into a small heart and glued it on the fur. I cut a small length of this awesome sparkly gold bias tape I had, and glued it on as a collar. 
I sewed the buttons on by hand, and used the machine to create the cat's big smile. 


After all was said and done, I thought, damn, this is way to cool to put on the floor.


So I stuck the cat in an empty frame I had laying around. It was tough trying to find the right background color to accent the cat properly. Life is tough when your fur is five million different colors. 

I did not have plain black or white paper. All I have in the house is piles and piles of scrapbooking paper. I thought this blue paper from Amy Buter looked the best, but I'm still not happy. (Don't mind the wrinkle on the right side...I'll fix that...one day.)


Now I have an awesome piece of new art that makes me giggle a bit inside every time I see it!

Do any of your projects turn out different from how you imagined? 
Do they ever turn out more awesome!?


Monday, August 20, 2012

My Top Four Patterns to Sew for Fall/Winter!

Summer is quickly coming to an end, so that means I get to think about what patterns I want to sew for the fall! I've been really bad about sewing garments from my own self-drafted patterns, instead of using all the beautiful patterns I read about online and see other bloggers sew up. I've decided to pick five patterns that I would love to make for the fall, but honestly, if I make two of them I'll be over the moon!

Somehow, the majority of the patterns are from the indie pattern designer, Sewaholic. These are some of the most popular patterns in the diy sewing world, and I haven't made any of them yet! That is going to change. I am so excited to start one of these projects, I just can't decide which one! 


1. Sewaholic Cambie Dress


2. Sewaholic Pendrell Blouse


3. Sewaholic Renfrew Top


4. Victory Patterns Ava Top

5. This one is a mystery. 
I found the most darling blouse pattern online the other day. It had cute short sleeves and a very interesting twisted collar. I did not pin the pattern like I should, and now I can't remember the name of the designer, the pattern, or anything! Please help!

Saturday, August 11, 2012

The "Lets Get Back to the Sewing Room" Patchwork Pillow

I've been missing my sewing room lately. I haven't sewn anything in what feels like weeks because I've been busy with so many other things going on in my life right now. I was feeling really down last night when S game me some good advise, he told me to just go into my sewing room and make something! So, this afternoon I put aside everything else on my plate, and made this pillow!  


Wednesday, March 28, 2012

Kilby Gets an Upgrade

So, I have a lot of stuff. I don't mean to acquire so many things as I do, it just happens! So many tiny things go into sewing, crafting & the like...it is difficult to be a crafter without things to craft with! As a result, I need a ton of storage. 

Two apartments ago S and I bought the Kilby from my favorite home store, IKEA. The Kilby has been very useful for storing things, but unlike its grown-up big brother, the Billy, the Kilby is not very pleasant to look at. The blonde wood is okay, not my favorite; but the nondescript grey backing is just so sad. I've been wanting to cover it up for some time now, but have been unable to commit to a pattern.

In case you were wondering why S and I bought the ugly bookshelf, it is because the Kilby costs decidedly much, much less than any of the comparable Billy products. In fact, I just bought my first Billy shelf this week!  

Last week S and I had a rare day off from work together. The whether was great so we hit the city, hanging out at all our favorite places. I decided that today was the day that we fix up the sad Kilby, so we went to Trohv, I picked out all  my favorite spring-weather papers, and we went home & got to work!  


Before!
See the grey + blonde bookcase on the right? Sad, huh.


 Before - All cleaned off. Notice we also took down the black wall shelf on the left?

Before

 We cleaned the Kilby from top to bottom to get rid of all the dust.
To test out the effectiveness of this adhesive we put a test strip of paper on the bottom. 
What pretty piece of test paper!
As expected, the adhesive worked great.


I laid out the paper rolls to measure. I wanted to cut as little as possible.  

We taped the edges of the shelf walls with painters tape to protect them from the spray adhesive.

We decided to cut the paper about an inch longer on each side so we could razor the edges for a nice, clean finish.


After!


I just love how it turned out! The sunroom is SO much more cheery now that the grey backing has been updated to bright dots & floral prints.
The project was quick & easy; with two people it took us less than two hours from start to finish. 


Thanks for checking out my bookcase makeover! I hope you have been inspired to update an old piece of your furniture into a piece that makes you smile.

Wednesday, March 7, 2012

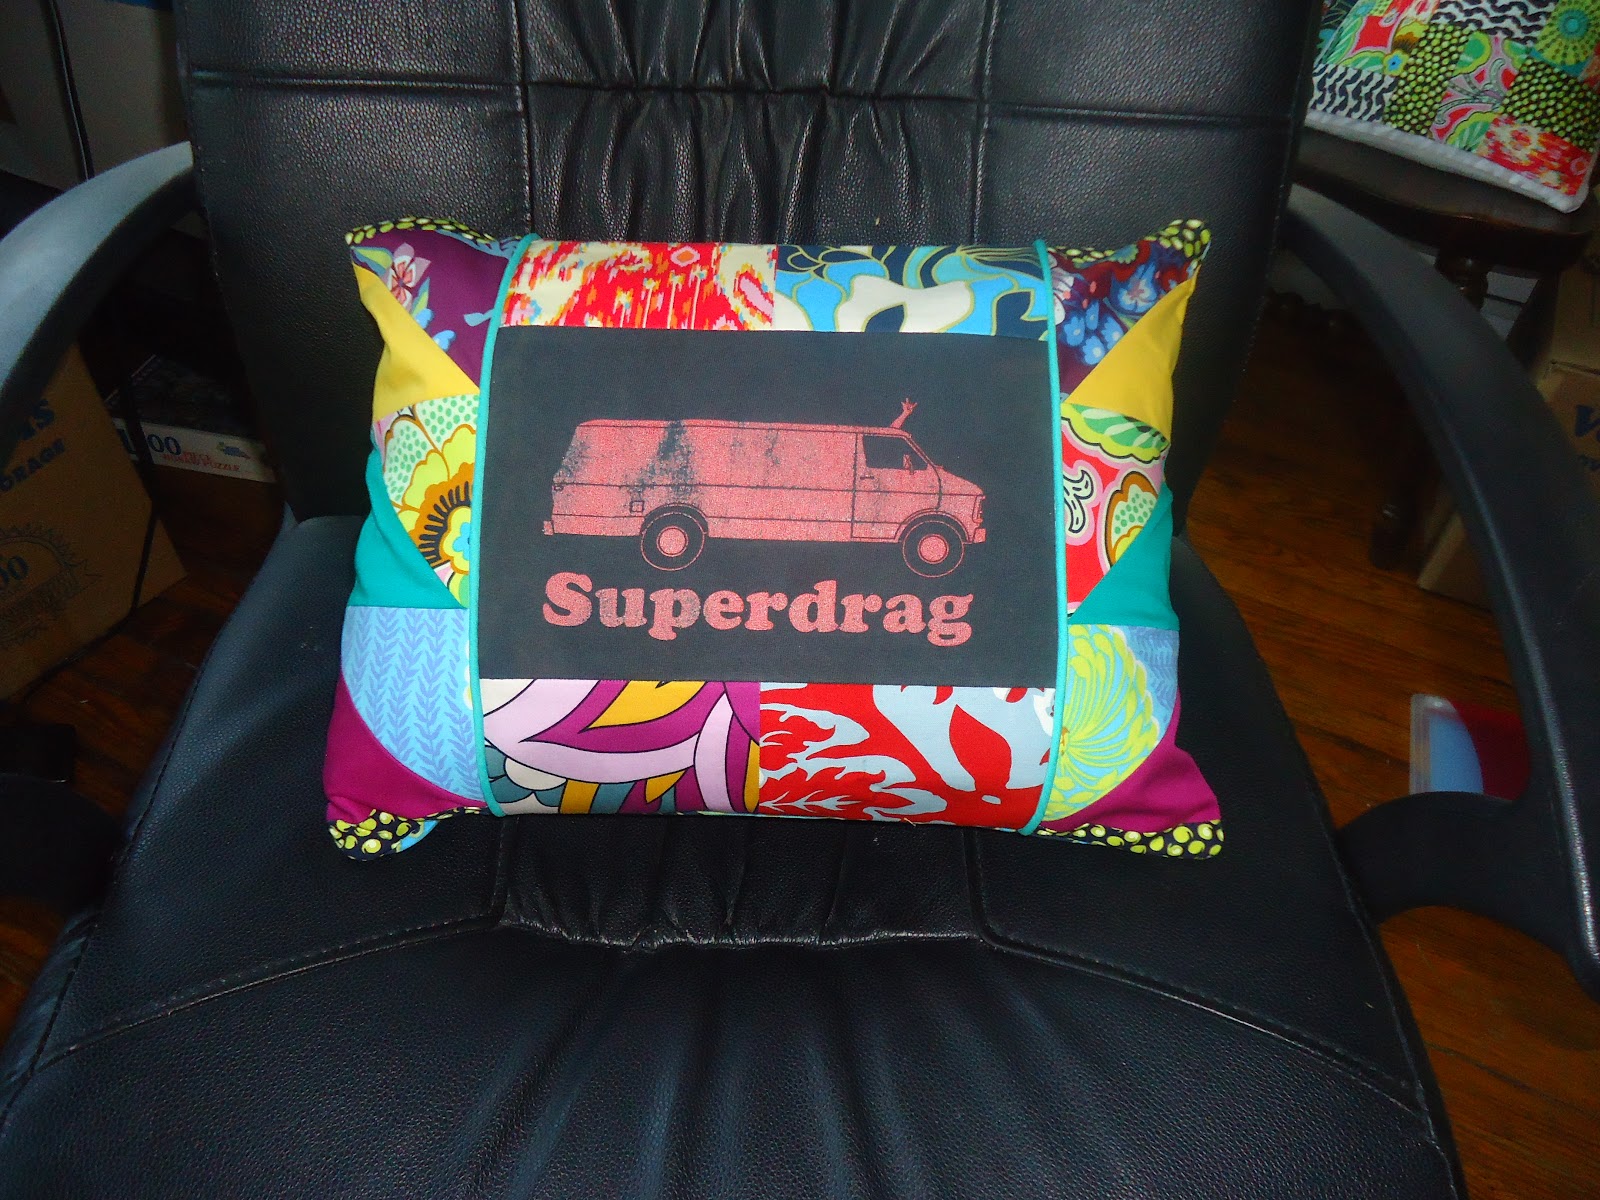
Superdrag Pillow!

I love sewing & I love music. I also love re-using things that were otherwise going to be thrown away. 
These three loves of mine were the inspiration for my latest project - the Superdrag pillow!

S loves live music & as a result, he has so many concert t-shirts. We have been steadily going through our belongings & trying to downsize. The other weekend we both went through our closets & compiled three large trash bags of clothes we wanted to donate to Goodwill. Some of our clothes were un-donateable...really, unwearable, on the last thread of their existence.
While I do not mind tossing out old socks with holes in them & other like-minded clothes, I could not stomach S wanting to toss out some of his old concert t-shirts! I mean, those things have a history! Concert t-shirts should last forever, even if they have holes in the armpits & fraying threads everywhere. 

Concert t-shirts are reminders of good times that were had & should be kept forever!  

Since S was not as moved as I was, I confiscated his three concert t-shirts from the trash pile & made the decision to make pillows out of them. I mean, he had had the Superdrag t-shirt for over 10 years....I could not let him throw it away!

I spent all day yesterday making this one so I could surprise S when we saw each other at the end of the day.
I finished it just in time & he was surely surprised! 
I was happy. =)


I hope you are inspired to re-use an item of yours that was destined for the trash bin & make it into something beautiful!


Before!

Check out the frayed collar

And the holes in the armpits!
This t-shirt is perfect to me......I can't believe S wanted to toss it away!

I drew up my own "pattern". I re-did the measurements a few times, but in the end the project turned out exactly how I wanted.


During!

Front panel
I interfaced every piece of fabric that went into this pillow.
I used a mix of vintage t-shirt, vintage canvas, designer quilting fabric, non-designer quilting fabric (the yellow), & a random piece of hippie-looking fabric I bought in 2009.

The entire front - finished
I cut & pieced those triangle pieces myself!
And check out that aqua piping---awesome!

The front & back panels - I opted for an exposed zipper for a quirky look


After!


Click the pictures to make them bigger!


Back zipper detail


Side detail

Other side detail

Biscuit & the Superdrag Pillow!


Monday, February 27, 2012

Finishing a UFO! (Unfinished Object)

Now, I like to think that I am the type of person who starts a project, and doesn't start another project until the first one is finished. 
However, I am not that type of person. ;-)
I'm about 50-50, really. Fifty percent of the time I'll finish a project that I started within a reasonable amount of time. And the other fifty percent of the time I'll start a project and never, ever finish it. Then, without warning, it becomes a UFO - otherwise known as the dreaded unfinished object. 

This particular UFO was started in 2010, back when S and I lived in our second home. I had recently discovered the world of designer fabrics, purse patterns, & all the glorious ideas that come along with the sewing world. I was elated! I bought yards upon yards of beautiful fabrics & many, many patterns.
When I first sat down to begin my first project, something happened. 
I realized that all the fabric I had just spent hours picking out & days waiting for it to be shipped, this fabric, well it was just too beautiful to cut into! 
I was scared; I did not want to ruin the perfection of an entire yard of premium fabric.
So, I waited a few more weeks, slowly building up the courage to make that first cut.

The first purse pattern I wanted to tackle is this one, by Izzy & Ivy.
I loved (and still love!) the contrasting trim fabric & body fabric. I love the metal details on the handles. I also love the shape & the bow! The pattern arrived in a cute paper envelope, and the pattern was drawn on medium weight white paper, not the slippery tissue paper that I was expecting. The pattern was easy enough to cut out, that did not take too much time. I had bought some nice fusible fleece to line the bag with, and I also decided to install a magnetic clasp to help the bag stay closed.

I had all the trappings to finish this bag! Somehow though, life got in the way of my sewing dreams. I'm not sure how many hours I spent working on the purse while I was in Silver Spring, but I only got about 1/3 of the body sewn together. And there it sat, for over a year!

A few days ago, S & I decided to rearrange & tidy our home. It was then that I discovered the bag that was hiding my sad UFO. I decided that enough was enough, and I needed to finish the darn thing.

The funny part about this UFO is that I actually lost the pattern directions. I was able to locate all the fabric pieces that I cut out & all the paper pattern pieces, but not the directions!
I decided just to wing it. And you know what, it turned out awesome.  
I spent about four straight hours this afternoon finishing the bag, right down to the bow on the front!

After finishing this bag I had decided one thing: I'm still not entirely sure that I enjoy bias tape. I understand its use, and without it, this bag just would not work. I thoroughly read this tutorial & this tutorial on how to install bias tape, and mine did not turn out like the pictures in the tutorials. In my defense though, it was my first time!

That thought aside, I think I made a pretty sweet looking bag!    


Before I installed the handles

Close-up of zipper pocket, magnetic clasp, & slip pocket 

Close-up of handle part

Two handles & four handle tabs (I sewed the metal bits to the tabs first)

Close-up of the front bow

Its finished!

This purse is quite large, big enough for a large laptop, a cardigan, some books, some snacks, your wallet, & a small kitten.
I'm about 5'2 and this bag dwarfs me. I do enjoy a large bag though; more room to put all my stuff! 

I think this bag turned out just great!
And I love how well interfaced it is; it stands up on its own!
The fabric I used for the body & tie is by the very talented Tula Pink.
The navy fabric is a heavyweight canvas. I also used navy bias tape to complete the contrasting look.


I hope you have been inspired to go off & finish a UFO of your own!